Layered Surfboard Glowforge XTool CNC Guide
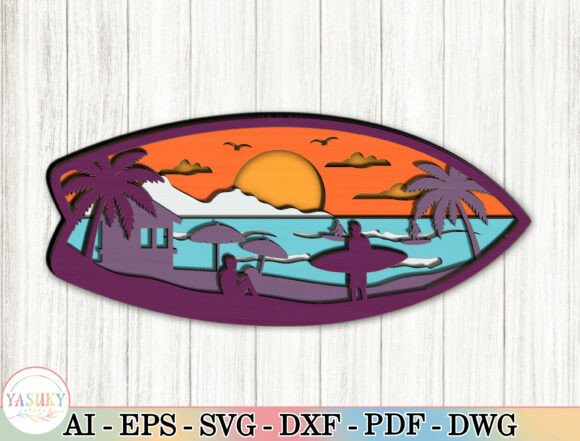
There is a distinct satisfaction in watching a flat sheet of material transform into a scene with tangible depth. This is the core appeal of the Layered Surfboard Glowforge XTool CNC project. It moves beyond simple silhouette cutting, inviting makers to explore dimensionality through stacked vectors. Whether you are using a diode laser, a CO2 machine like the Glowforge, or a hybrid cutter like the XTool, this design archetype offers a perfect balance of technical challenge and aesthetic reward. The concept is straightforward yet visually arresting: a surfboard outline serves as the frame for an intricate coastal landscape, built layer by layer to create a shadow box effect that catches light and casts shadows in dynamic ways.
For creators, the value lies in the versatility of the format. A layered surfboard is not just a piece of wall art; it is a modular system for storytelling. You can adjust the number of layers to suit your material thickness, change the wood species to alter the mood from rustic to modern, or scale the dimensions to fit a specific niche in a room. This adaptability makes it an ideal project for hobbyists looking to refine their stacking techniques and small business owners seeking a signature product for coastal markets.
Understanding the Mechanics of Depth
The magic of this project happens in the spacing between the cuts. Unlike traditional 2D engraving, a Layered Surfboard Glowforge XTool CNC build relies on the physical separation of materials to generate realism. Typically, these designs utilize six to seven distinct layers. The frontmost layer defines the surfboard's rail and nose, acting as a window into the scene behind it. Subsequent layers peel back the environment, revealing palm trees, a beach house, distant mountains, and finally, the gradient of a sunset sky.
Success in this area requires precise file preparation. Your vector lines must be clean and closed to ensure the laser cutter follows the path without hesitation. When setting up your job in software like LightBurn or the manufacturer's native interface, consider the kerf—the width of material removed by the laser. For tight-fitting stacks, you may need to offset your cut lines slightly. However, for shadow boxes, a small gap between layers is often desirable to allow light to penetrate deeper into the piece, enhancing the 3D illusion. Using materials like 3mm (1/8 inch) or 6mm (1/4 inch) plywood, MDF, or acrylic provides the structural integrity needed for larger statement pieces while remaining manageable for most desktop machines.
Creative Variations and Material Choices
While the standard approach involves natural wood tones, the creative possibilities expand significantly when you experiment with finishes and materials. The Layered Surfboard Glowforge XTool CNC workflow supports a wide range of aesthetics:
- Rustic Coastal: Use unstained birch or maple plywood. The natural grain adds texture to the waves and sand, creating an organic feel that suits beach houses and cabins perfectly.
- Modern Tropical: Paint individual layers before assembly. Try deep blues for the ocean layers, warm oranges for the sunset, and stark white for the surfboard frame. This high-contrast look appeals to contemporary interior design trends.
- Mixed Media: Combine wood with acrylic. Use clear or tinted acrylic for the sky or water layers to simulate translucency, while keeping the foreground elements in solid wood for contrast.
- Backlighting: Design the rear-most layer with cutouts or use a frosted acrylic backing. Installing a small LED strip behind the piece turns it into a glowing night light, emphasizing the silhouettes of the surfers and palms.
These variations allow you to tailor the final product to specific audiences. A real estate agent staging a coastal property might prefer the subtle, natural wood version, while a surf shop owner might opt for the vibrant, painted edition to match their brand colors.
Practical Applications for Makers and Businesses
Beyond personal decor, this project type holds significant commercial potential. For entrepreneurs and freelancers, the Layered Surfboard Glowforge XTool CNC design is a scalable asset. Because the files are vector-based, they can be resized without losing quality. You can produce small 12-inch versions as desk accessories or gifts, and large 4-foot iterations as focal point wall art for offices and restaurants.
Consider the production workflow. To maintain consistency across multiple units, create a jig or alignment template. This ensures that every layer stacks perfectly square, which is critical for the professional finish clients expect. Sanding edges between layers before final assembly can also elevate the perceived quality, removing burn marks and smoothing rough spots. If you are selling these items, offer customization options. Allowing customers to choose their wood stain or add a personalized nameplate at the base increases the perceived value and emotional connection to the piece.
Educators and workshop leaders can also utilize this project to teach advanced fabrication concepts. It introduces students to depth mapping, material properties, and assembly logic. Breaking the project down into discrete steps—cutting, sanding, staining, and stacking—provides a clear roadmap for learners to follow, resulting in a high-confidence finished product.
Optimizing Your Workflow
To get the best results from your Layered Surfboard Glowforge XTool CNC projects, organization is key. Keep your digital files well-labeled, distinguishing between cut lines, score lines, and engrave areas. When working with multiple layers of similar shapes, it is easy to mix them up during assembly. Numbering the layers in the design phase or using tabs to hold them in order during cutting can save time and frustration.
Furthermore, pay attention to the weight distribution if you plan to hang the piece. Seven layers of hardwood can become surprisingly heavy. Ensure your hanging hardware is rated for the load, and consider reinforcing the back with a thin substrate if the layers feel unstable. For outdoor installations, seal the wood thoroughly with a UV-resistant varnish to prevent warping and fading from sun exposure.
Ultimately, the goal is to create a piece that feels intentional and crafted. Whether you are making one for your own living room or producing a batch for a holiday market, the layered surfboard design offers a robust framework for creativity. It bridges the gap between digital precision and tactile artistry, resulting in a product that resonates with anyone who loves the ocean, surfing, or simply the beauty of well-executed design. By focusing on clean execution and thoughtful material selection, you can turn a simple SVG file into a standout piece of functional art.